
Ultimaker 2+ 3D Printer Rated
- Print Quality
- User Experience
- Ease of Use
- Durability
- Value for Money
Craft Schmaft Verdict
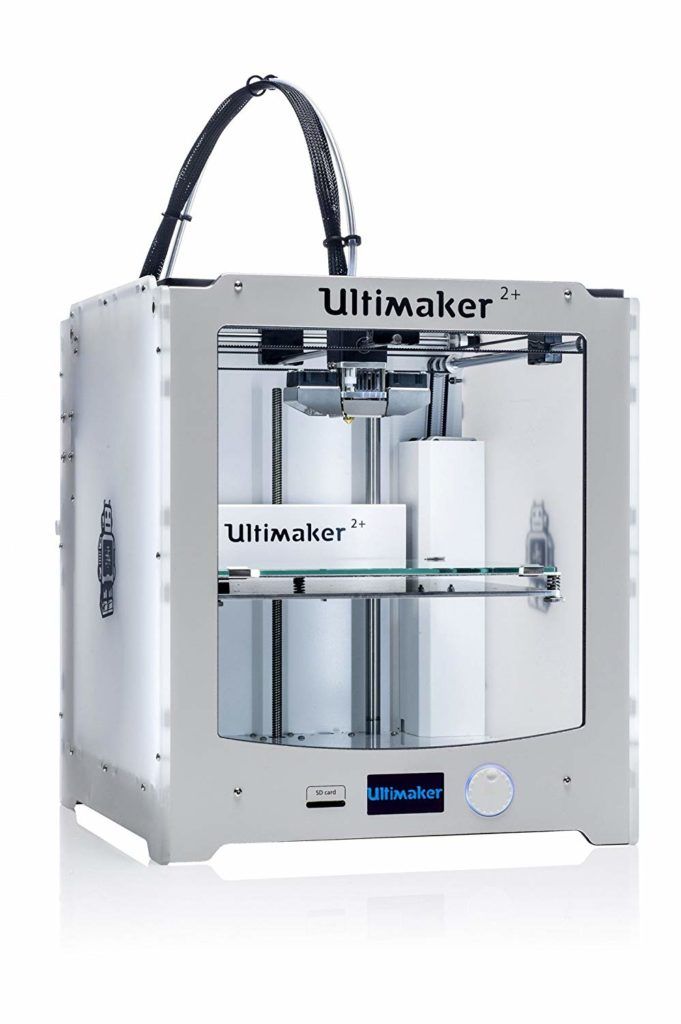
The Ultimaker 2+ 3D Printer has a large print bed, great quality and is easy to use, but comes with a fairly high price tag and cannot connect to directly to WiFi or your computer.
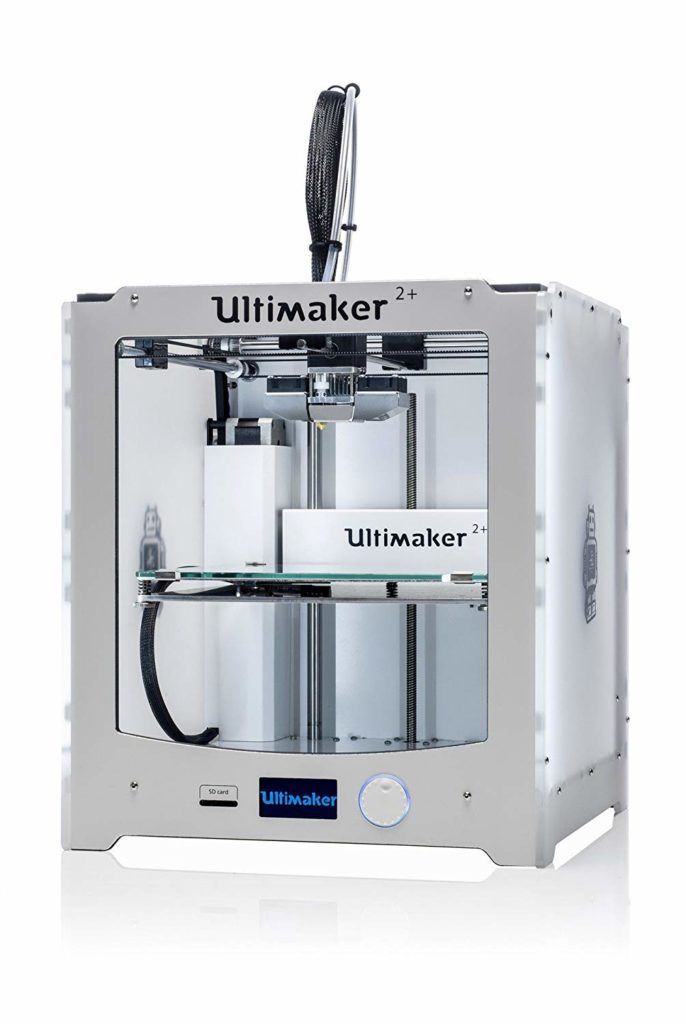
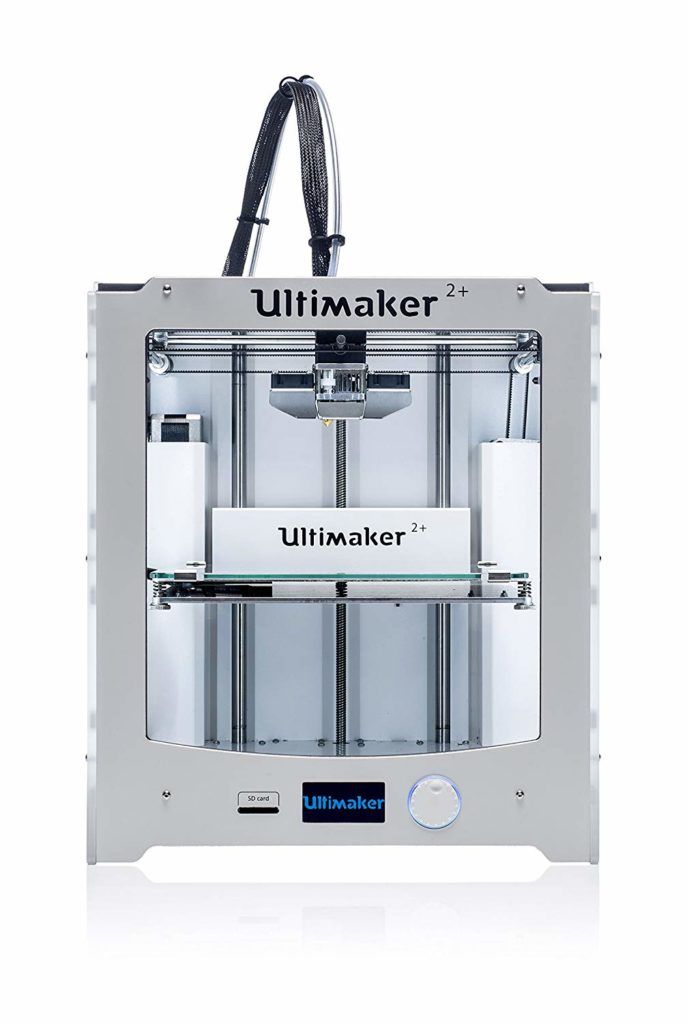
If you’re looking for a compact, easy-to-use 3D printer, then you may find the Ultimaker 2+ to be an excellent match. It’s easy to set up, comes with a large print bed, and, since it’s fully enclosed, the design is very safe.
But is it the right model for you? To help you make an informed decision, we’ve evaluated this 3D printer from top to bottom, picking out all the good and the bad.
You may find the price tag and the printing process less than impressive. But does that mean you should keep shopping? Let’s take a closer look at the Ultimaker 2+ 3D Printer. With the full story, you can decide for yourself if it’s right for your needs.
Contents
Ultimaker 2+ 3D Printer: The Details
Specs
- Weight: 23.8 lbs.
- Dimensions: 19.37 x 13.46 x 21.97 inches.
- Print Dimensions: 22.3 X 22.3 X 20.5 cm.
- Filament Types: ABS, PLA, CPE, UV luminescent, specialty materials.
- Ready to Print? No.
- Compatibility: Windows XP+, Mac OS X 10.6+, Linux Ubuntu 12.10+.
- Warranty: One-year warranty.
How Does It Work?
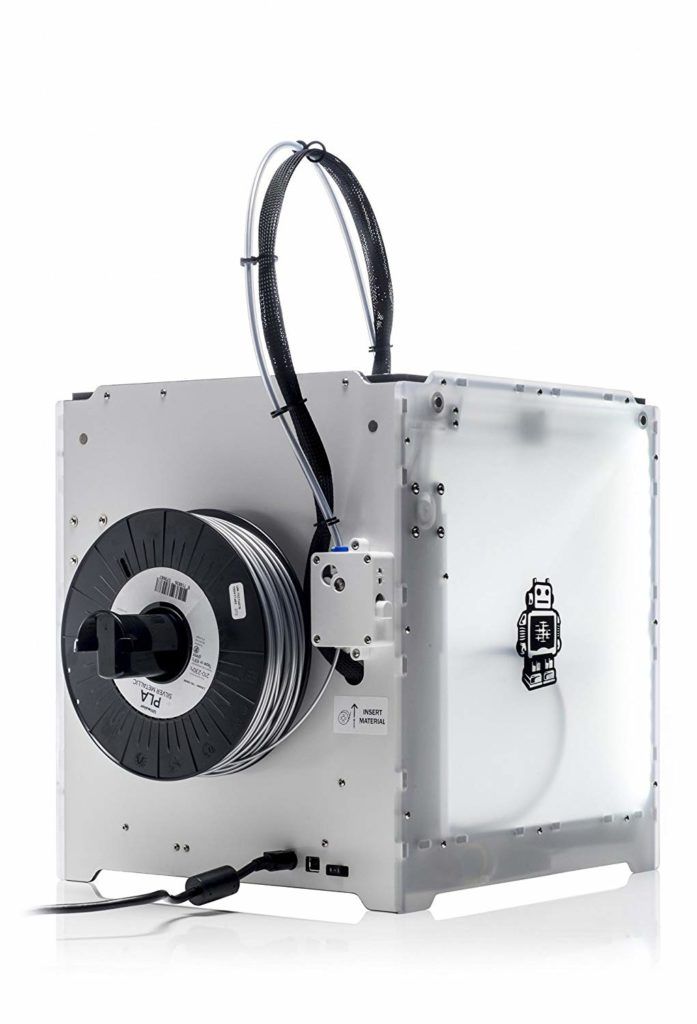
The Ultimaker 2+ 3D Printer is very easy to set up. First, you’ll install the spool holder by inserting it into the slot at the printer’s back. Then, place the glass plate inside the printer, clamp it down, and plug in the device.
Now comes the tricky part: leveling the print bed. First, turn the knob on the printer’s face until there is 1 mm. of space between the print bed plate and the nozzle. Adjust the plate until it is level. Then, finely adjust the bed with the included calibration card. Place it in between the nozzle and the bed, and turn the knob until there’s friction with the card. Repeat these steps with each point until the bed is completely level.
When the bed is level, you can begin the printing process. Start by heating up the print bed and inserting the filament into the extruder. Then, install Cura and create your design. Send it to the splicing software and then transfer it to an SD card. Insert the SD card into the slot on the printer. Press “Print” – and you’re ready to go!
Accessories
- Spool holder.
- Glue stick.
- Power supply.
- USB cable (for firmware only).
- Test print.
- Hex wrenches.
- Grease.
- Calibration card.
Features
Print Dimensions
The Ultimaker 2+ 3D Printer offers a surprisingly large print bed – especially for a compact machine. It allows you to print in dimensions up to 9.1 x 8.9 x 8.1 inches (or 23 x 22.5 x 20.5 cm). As such, you’re not limited to only small prints, and fewer projects will need to be broken down into smaller pieces and later assembled.
Filaments
Some 3D printers use their brands’ filaments exclusively, or limit you to only one or two options. Luckily, that’s not the case with the Ultimaker 2+. It’s officially compatible with PLA, ABS, CPE, CPE+, Nylon, PC, TPU 95A, and PP, according to the company website.
You can use any color you want, but since there is only one extruder, you must pick one color or material at a time. You also can only use standard 2.85 mm filament, as that’s what will fit the nozzle on this printer.
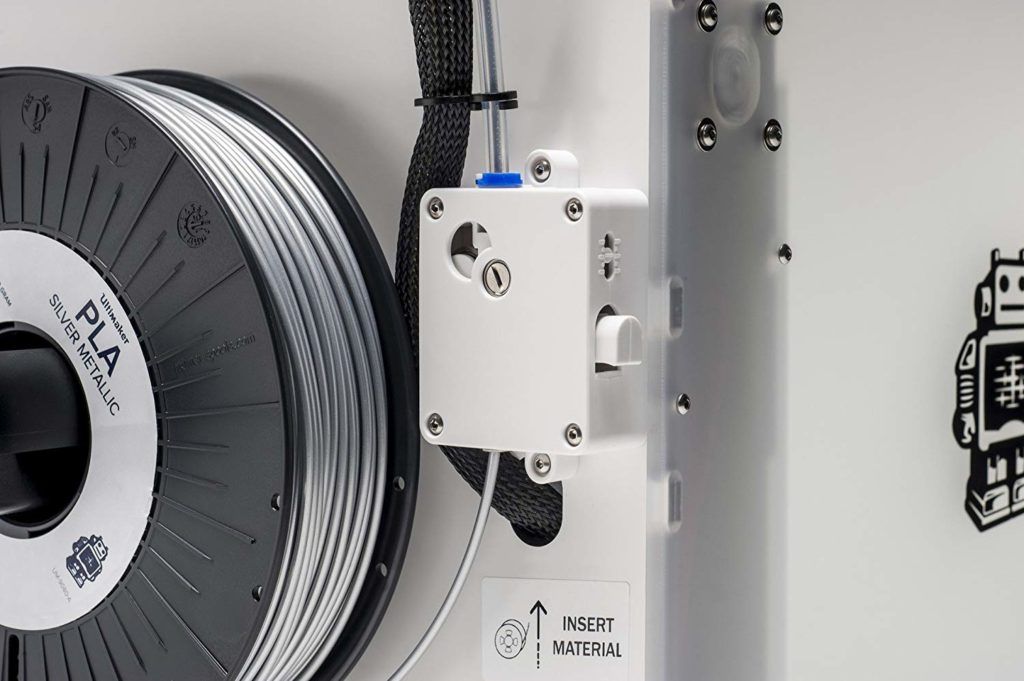
It comes packaged with a spool of PLA material so that you can get started right away. The machine does accept all kinds of filaments, but the Cura program included with the printer has optimized profiles for the Ultimaker materials specifically. The Ultimaker filaments also have the most extensive testing with their machines.
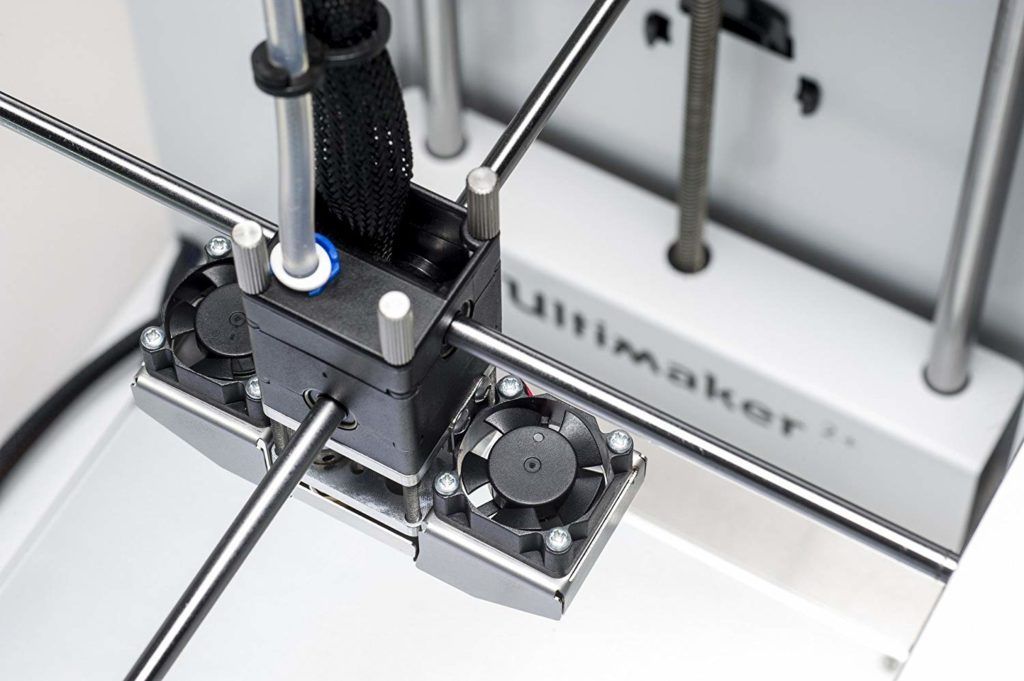
Nozzle
Speaking of nozzles, the Ultimaker 2+ includes four different nozzles and allows you to switch between them. The pre-installed Olsson Block makes this possible, so you’re not restricted to one dimension.
The nozzle sizes include 0.25 mm, 0.40 mm, 0.60 mm, and 0.80 mm. The different sizes allow you to print faster or create more detail in your items. If your project demands a specific trait or you’re in a hurry, this printer will accommodate you.
Heat Bed
This 3D printer’s heat bed is a glass plate placed on a moveable, motorized carriage. This allows it to easily shift during the print process in a Z or vertical axis. Meanwhile, the extruder moves on the X and Y (horizontal) axes, ensuring your final creation is full-bodied and exactly to your specifications.
As a plus, the bed can be easily removed when your item is finished, so you won’t be fishing around a hot area. To set the temperature of the bed, just use the scroll wheel on the front and wait for it to preheat.
Packaging
The Ultimaker 2+ comes in innovative packaging. Instead of difficult plastic wrappers or clamshells, they have a cardboard box, surrounded by protective styrofoam, secured with a fabric strap and a plastic buckle. The packaging also has a handle for ease of transportation.
To open the box, you just open the buckle and take the cardboard box out of the styrofoam. The styrofoam has parts secured within special cutouts and you simply lift the pieces out, and cut one single zip-tie that secures the print head.
The cardboard and styrofoam, plus the fabric strap and plastic buckle, are reusable – meaning you can store your 3D printer in the original packaging if needed.
Since the packaging includes a carry handle, it’s easy to transport the printer if needed. If you move or need to take the printer to a work space, it’s easy to pack it up and carry it without worrying that the printer will become damaged.
Controls
The Ultimaker 2+ 3D Printer does not have a touch screen like some other models, but it has a very user-friendly control panel. The screen shows the options, and the control button allows you to scroll through the choices as you rotate it.
To select the option you want, press the button. It will make a beeping sound to let you know that your choice has been selected.
If the button is blinking, it means that the machine is waiting on a user selection.
Troubleshooting
The Ultimaker website is full of helpful information for beginning users and experienced users alike, including a troubleshooting section. If your prints are not turning out how they should, there is probably an article on the website to help you sort out the issue.
They even have a Top Ten section for the ten most helpful solutions, so you can learn about common 3D printing issues early and hopefully never have the problems yourself!
Ultimaker 2+ 3D Printer Review
The Positives
Easy to Set Up
For the tech-savvy or newcomers alike, the Ultimaker 2+ 3D Printer is surprisingly easy to set up. While it doesn’t provide auto-leveling as some models do, the included tools make this a straightforward process that requires only a few minutes of your time. As a plus, once you’re familiar with the process, leveling all future beds will be hassle-free.
The Ultimaker company has what they call the “first run wizard” and it is a guided program to help users complete the first use of the machine. It automatically starts when the machine is turned on for the first time.
Easy to Use
To begin using this printer, just install the included Cura software onto your computer. From there, either find a design on the internet or create your own. Once that’s complete, run the design through the splicing software and transfer it to an SD card. This will ensure it’s printing-ready. Insert the SD card into the printer, press “Print,” and watch as your creation comes to life.
Safe
Since this 3D printer is mostly enclosed, it’s much safer than open models. There’s less danger of wayward objects or dust falling into the print area, and curious hands are barred from getting seared. This is especially important if you plan on bringing this into the classroom. It’s a fairly safe printer for kids to use or for active homes.
Versatile
Unlike some models, which limit the filaments you can use or your printing dimensions, this Ultimaker 2+ gives you a wide range of options. Whether you’re creating something for fun, need a component for a greater project, or use the machine for a small business, it is versatile enough to suit your needs – and creativity.
Compact
The Ultimaker 2+ 3D Printer may have a large print bed, but the printer itself is quite small. If you lack a big workspace, need to store it often, or want to transport it more easily, this machine’s size is ideal. At only 19.37 x 13.46 x 21.97 inches, it won’t demand much space.
Additionally, the packaging we mentioned earlier makes it really easy to transport. The relatively small size and reusable box with handle makes it more portable than other models.
Advanced
This 3D printer can print up to 300 mm/s and has 0.02mm layer resolution.
The Negatives
Expensive
While this is a high-quality 3D printer, it doesn’t have all the features you might expect of a $2,500 printer. If you can afford it, this is certainly a good design. You won’t be wasting your money. However, if that’s not in your budget, don’t worry. There are countless 3D printers with similar features at a lower cost.
Inconsistent Prints
Since the print bed must be leveled manually, there is room for error. This may result in a few inconsistent prints, especially for larger items. The detail and the quality may vary if you don’t level the bed to perfection. However, with a few test runs, you should find the correct balance and enjoy the printer’s true quality.
Can’t Print from Computer
Sadly, the Ultimaker 2+ can’t print directly from your computer. You have to place your file onto an SD card first and then insert it into the printer. It’s not designed to connect to Wi-Fi, so, unfortunately, that extra step is necessary.
Overall Verdict
After looking over all the positives and negatives, we cautiously recommend the Ultimaker 2+ 3D Printer. With the rather easy set-up, the compact size, and the large print bed, this is a great design.
However, if you can’t afford the price, are uncertain about the leveling process, or would rather print directly from your computer, it may not fit your needs. If these conditions don’t apply to you, then it may be your next great purchase.
Where to Buy the Ultimaker 2+ 3D Printer
The Ultimaker 2+ 3D Printer is available from only a few online retailers.
Dynamism ($2,499.00)
MatterHackers ($2,499.00)
And of course, it is available on Amazon.

That’s our review of the Ultimaker 2+ 3D Printer. Are you going to give it a look?


