
Want to spice up your home with artwork that seems unconventional? Artwork that you can create yourself? Then you’ll want to explore the practice and history of string art.
String art is a craft that sees you creating an outline of an object or word with nails, then stringing those nails with lines of thread until the empty space between the nails fills with bright color.
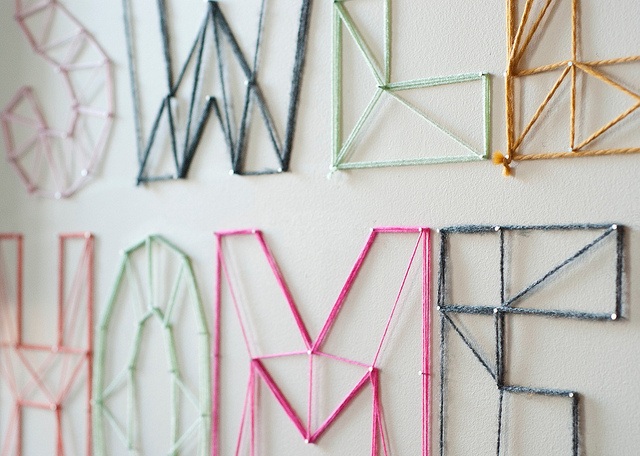
By: decor8 holly. Creative Commons Attribution-Share Alike 2.0 licence)
You can place string art’s abstract silhouettes up on the walls of your living room, home office, or a dorm; its versatile look makes it fit in anywhere.
String art is a craft that takes a significant amount of time, but that brings a sense of originality to your home.
Contents
The History of String Art
Mary Everest Boole was the first woman on historical record to create what we now recognize as string art.
In basing her craft on a French, algebraic formula, Boole was able to inspire mathematicians and craftsmen alike in the late-nineteenth century.
John Eichinger followed her example in the 1960s, marketing string art kits through his company, Open Door Enterprises.
Eichinger’s motivations were far less mathematical than Boole’s. He inspired a do-it-yourself art trend that dominated the 1970s, but which still remains present and aesthetically relevant in a number of homes today.
String art, then, bridges mathematics and creativity. The craft requires attention to detail as well as an inspired mind, and the art that results from one creator’s hard work can beautify a home for years to come.
The balance string art offers in this way is striking – even if the relationship between mathematics and artistry is not the first thing that comes to mind when someone looks at nail string art hanging on a guest room wall.
Different Forms of String Art
The kind of string art project that you choose to undertake is limited only by your imagination – though there are some factors that come into play, which will help you determine the size and complexity of the work.
Consider some of the following and see which type of project most appeals to you.
Silhouettes
One of the most basic forms of string art involves creating a silhouette of a particular shape or structure with nails and string.
These silhouettes can come in any form. You can adorn your walls with simple string art triangles, or you can try your hand at a string art heart or even a more traditional silhouette. Because of their opacity, silhouette projects are great for beginners who are learning.
Words
One step up from silhouettes are string art words.
These sorts of projects are a little more complex than simple silhouettes; they take more time to complete, due to there being more elements to consider, and they also require a more varied breadth of material.
The backing you use when creating string art words, for example, can’t be easily taken from the scraps of a different project.
You have to think carefully about exactly how much space you’re going to need for your project as well as how you want to break up your time so that you can complete your project without losing your patience entirely.
Monogramming
From words, you can graduate in difficulty to string art monogramming. This process seems as though it would mimic the process of embroidering a piece of fabric. Not so!
Monogramming with string art simply requires that you follow a more detailed design when establishing your nail outlines and laying out your string.
For example: If you wanted to try and embroider your child’s name into a piece of string art for their birthday, you would first establish an inner layer of nails that spelled out, in bubbled letters, their name. Then, you would create an outer layer of nails in any design you so choose.
The negative space left free of string – space that should spell out your child’s name – serves as the “monogramming” within this particular crafting practice.
What You’ll Need for DIY String Art
Deciding on your DIY string art project is the first thing you’ll need to do if you want to try your hand at this craft.
.jpg)
By: String Art Heart (Creative Commons Attribution-Share Alike 2.0 licence)
Once you have your idea in mind, you can take the necessary steps that will enable you to retrieve all of the most appropriate materials for your design.
Those materials include the following:
Patterns
Patterns are perhaps the most essential tool in the string art toolbox. They are what keep your design looking professional and crisp, even as you work on it in the comfort of your home.
Some string art patterns are available on websites like Pinterest and are free for public consumption. If you want to work on something truly original, though, you can make use of artistic programs like Gimp in order to create the silhouette you’d like to emulate.
If you feel like using a simpler process to create your pattern, you can also access clip art in Microsoft Word or play with a variety of fonts in the same document, should you want to work on word-based string art.
Backing
Once you’ve found or created the pattern for your string art project, you’ll want to decide on your backing.
Most string art backing is made out of wood, but if you’re looking to make a less permanent exhibit, you could experiment with cork board or foam.
The size of your backing, though, is directly connected to the size of your project. If you’re looking to spell out a particularly long name, you’ll want to ensure that you buy a backing long enough to encompass all the letters equally.
Nails
One-inch standard nails tend to work best for string art projects, as they can be firmly embedded into your project’s backing while also sticking out far enough that you can wrap your string around them multiple times.
You can spray paint your nails different colors or purchase them in different shades, depending on how you want them to interact with your project at large, but don’t let the nail’s standard use as a tool limit your creativity!
String
At last comes the most important part of the whole craft: the string. Don’t use thread or any thin, breakable string. Instead, seek out string that’s meant for knitting or crocheting.
You’ll want relatively weighty pieces of string to help you form the body of your project. The color of the thread, though, is entirely up to you!
Feel free to mix and match while putting your project together until you find yourself satisfied with the art you’ve created.
How to Make Nail and String Art
Once you’ve gathered all of your materials together, creating your string art is just a matter of time – literally.
When you’re learning how to do string art, you’ll want to set aside a concrete and rather lengthy period of time where you’ll be able to work with minimal interruptions.
The process, though, will reward your hard work with creative, original, and beautiful creations. All you have to do is get started!
Bring Out Your Materials
Make sure all of the tools you need are easily accessible, either together in one workspace or within easy reach.
You won’t want to get part way through your project and realize that you’ve run out of thread, for example!

By: String Art (Creative Commons Attribution-Share Alike 2.0 licence)
Create Your Outline
Using one of the patterns you’ve found or created, you’ll want to create your project’s outline. Punch holes into the outline of your pattern, trying to keep the holes roughly half an inch apart as you go.
Once you’ve finished, you can pin your pattern down onto the backing of your choice, taking care to secure it as best you can, either with tape or with tacks. Then, you can start setting up your nails.
Hammer one nail a piece into your punched-out holes, taking care to leave about half an inch of nail outside of your backing.
Once you’ve made it all the way around your outline, lift your pattern off of the backing and admire your handy work.
String it Up
Next comes the most important part of the project: stringing up the thread! To begin, you’ll want to take the thread of your choice and tie it off around a particular nail.
Once the thread is secure, you will want to wrap it around your nail outline without spreading them out over the open space in between. That is to say, move from one nail to the next, winding your thread in a circle beneath the head of the nail before moving on.
Establishing a threaded outline along the nailed outline will keep your project looking organized.
Fill It In
Finally, you can move your thread all about your project! Try to move your thread diagonally across the length of your project, filling all of the open space in and making sure that one area isn’t under-threaded.
Every time you pass around a nail, make sure you wind the thread around it at least once, if not twice, to ensure its security.
Once you’ve filled your project to your satisfaction, cut your thread loose from what you have left over and tie it off on a different nail than the one you started with.
You’ll have a completed nail and string art project in front of you and a fantastic creative experience under your belt!
Here’s a video showing another example of how to do string art.
Conclusion
String art has a long crafting history, and its resurgence in recent years – in dorm rooms, family homes, and museums alike – is evidence of its longevity.
Practice the craft for yourself! Make a string art house, phrase, or monograph, and share it on your own walls or with someone you care about.
When you do, you participate in string art’s long crafting tradition while also bringing a taste of your own to the table.


