
With the cold months fast approaching, we can look forward to snuggling up with hot cocoa – so long as we have the right, cozy blanket for the job.
Of course, of all the blankets out there, perhaps the softest and warmest out there is a felt blanket, especially one made with fleece!
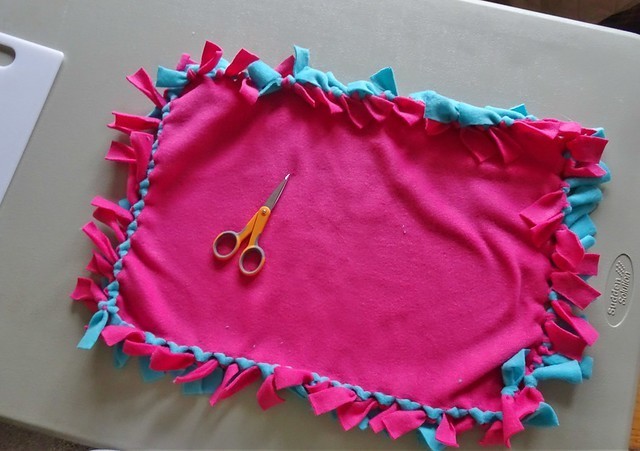
By echlds41 (Creative Commons Attribution-Share Alike 2.0 licence)
Other than being excellent at keeping you warm, fleece blankets are incredibly easy to make. With the tie knot blanket variety, you don’t even have to sew!
They’re great for when you have a shortage of blankets on cold days, and you need to keep yourself (and your loved ones) warm.
In this guide, we’ll discuss how to make a fleece tie blanket, and all the different variations you can create with this quick and easy project. But first, how did fleece tie blankets come to be?
Contents
History and Origin
Since we first domesticated sheep, humans have been using wool to keep ourselves warm. However, while it was excellent at retaining heat throughout the seasons, it had a great number of downsides: it was itchy, susceptible to moths, and it smelled terrible when wet.
Overall, our ancestors throughout the centuries accept that these flaws were necessary evils to stay cozy in harsher conditions.
Enter Malden Mills in the late 1970s. Malden Mills had been experimenting in polyester. Its engineers eventually found a way to wind superfine polyester yarn.
What they ended up with was a very light fabric that was water-resistant, and, most importantly, had good insulation. They named it fleece, which is also the term used to describe the wool coat of sheep – despite not originating from these animals.
Patagonia, a company that provided mountaineering outfits, introduced this fabric as a sportswear material. The fabric was called synchilla (synthetic chinchilla) and is considered to be the first generation of modern fleece.
Since chinchillas are the softest creatures on the planet (quite literally), this synthetic variant had already overcome wool’s biggest downside: itchiness. With its popularity on the slopes, fleece was soon incorporated into other articles of clothing.
Since then, fleece has been honed to become lighter, finer, and warmer. In the modern-day, companies, including Patagonia, continue researching ways to make fleece eco-friendly.
How to Make a Tie Blanket
Other than clothing, fleece makes for a great blanket. Rather than buying one at the store, you can easily make your very own – saving money, allowing you to personalize the design, and giving it a homey touch.
This fleece tie blanket can be made in about an hour and a half; by no means a lengthy project! All you need is to connect two fabric pieces, cut out the fringe, and get to tying!
Materials
- Two pieces of fleece fabric.
- A ruler.
- A piece of paper for measurement guidance.
- Scissors.

Method
- Begin by preparing your fabric. This can measure anywhere from 2.5-yards to 3-yards-long on each side. Children will do well with the smaller size (and can avoid tripping, especially for toddlers). For adults, 3 yards should be sufficient, although you can always use a bigger measurement for those who really want to snuggle up. For the pattern, you can choose any design that you’d like. A fabric that pairs a fun pattern with a more subdued, single color is always a good combination.
- Put one fabric on top of the other, wrong-sides together, and line up the edges. Try to create a square for both fabrics, although you don’t need precisely the same measurement on each side of your square.
- Now, take a piece of paper and fold it, so that it is a square. Place this square piece of paper on one edge of your fabric, and trace the paper. Cut out the fabric, and do the same for all sides. Alternatively, you could also use a scrap piece of fabric for the template. (This square doesn’t need to have exact measurements, but for those who are concerned about aesthetics, a good measurement is about 1/4 the size of your blanket.)
- Now, take your square template. Create a rectangle from this square 1 inch in width, by measuring 1 inch from one side. Cut out the rectangle.
- Pick a corner, and lay the rectangle along one side of the square you cut out. Trace out the longer side of this rectangle template. Continue doing so along all four edges of your blanket. This will be the template for your strips.
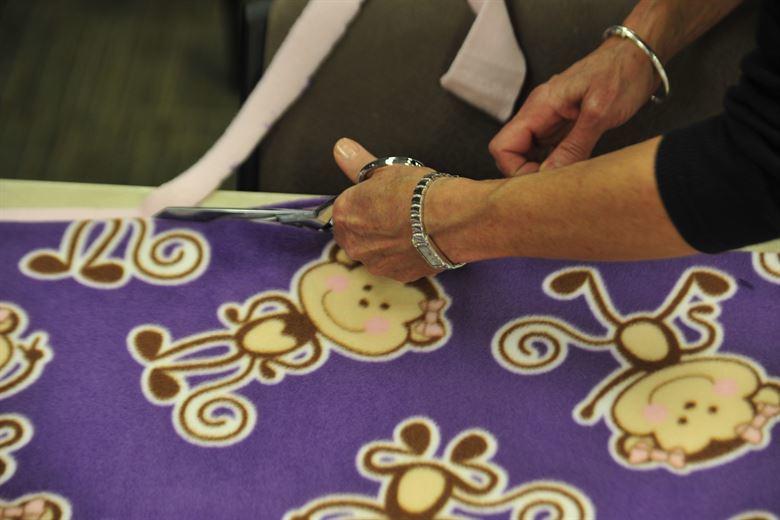
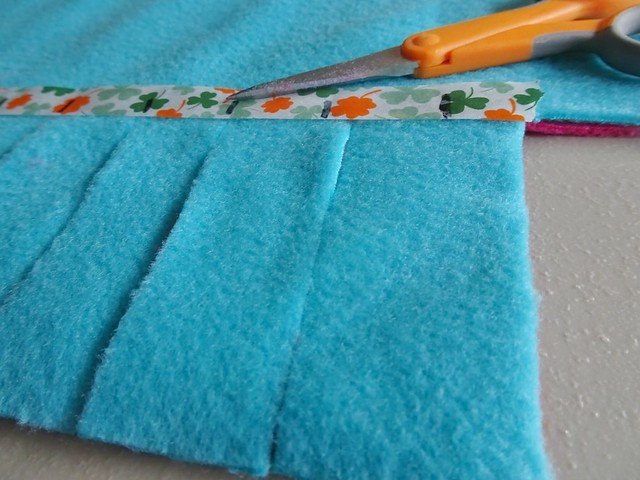
- Cut out the strips with your scissors, or a rotary cutter.
- Now it’s time to tie the knots! To lessen the chances of fabric slipping around, it’s best to tie the knots as soon as you’re done with one side of the fabric. Tie at least every other knot, and then go back to cutting another side. When you’re done cutting and tying all the sides, you can finish off all the other knots that need tying.
This video shows an example of how to make a tie blanket.
Fringe Shape Alternatives for Felt Blankets
To add a unique flair to your blanket, you can change up the shape of your fringe!
These are also great for those who don’t want to tie their blanket’s fringes, or who prefer a straight fringe for safety reasons (especially around children, who may become dangerously tangled).
Here are some ways to spice up your fleece tie blanket fringes:
- Use Pinking Shears: Cutting with pinking shears instead of straight-edged scissors can add a nice shape along the longer sides of your fringe. Alternatively, you can cut the sides of the blanket itself with pinking shears, so that the fringe’s shorter side has a different cut.
- Bunny Ears: You can shape your blanket’s fringe into bunny ears! Begin by finding the middle of each fringe piece’s shorter edge. Then, make a small, diagonal cut towards the outer edges, so a small triangle is formed at the tip of your fringe.
- Jungle Grass: Begin by taking one piece of fringe and picking the left or right edge. From this edge, cut a small diagonal shape across the fringe. Continue doing the same cut to the rest of the fringe pieces, angled in the same direction the entire way around.
Ways to Knot Your Fleece Tie Blanket
There are many types of knots that you can make. This style uses a knot that shows the coordinating fabric, making a great contrast.
- To create this knot, put your index and middle finger on top of the fabric, near the place where the knot should be.
- Then, twist the remaining fabric upwards, so that it wraps around your fingers.
- Next, take the tail-end of the fabric and make a loop around the fabric wrapped around your fingers.
- Tuck this tail end into the loop and pull. You may need to adjust the fabric to ensure that the coordinating fabric is facing you.
By AngryJulieMonday (Creative Commons Attribution-Share Alike 2.0 licence)
Alternatively, this technique is secure and clean. This knot is made by creating a small slit in the center of each fringe, right where the knot should be.
Put the end of the fringe through the slit, and pull. With a small enough slit, it will be tough to undo this knot.
Fringe Alternatives
If you’re the type who wants to be different from everyone else, you can toss knot-tying out of the window!
For a fresh, unique approach to fleece blankets, why not try out a unique way to secure edges? These new edges are a great way to spice up a new project or breathe life into an old fleece blanket.
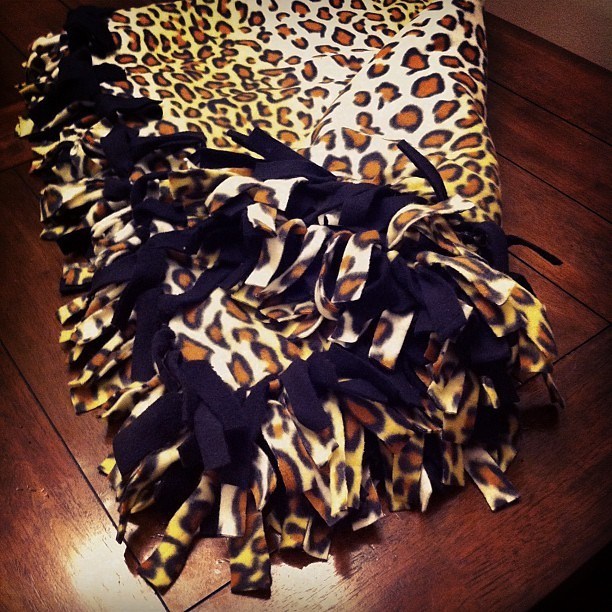
Braided Edge
This braided edge design pattern is an excellent alternative for fleece blankets that already have a tied knot. Of course, you could apply this design to completely new blankets, no tying required.
- To create this braided edge, prepare your fleece blanket just as you would before tying the edges. After you have finished cutting out the fringe, you can begin braiding.
- Start by folding each piece of the fabric in half, and cut a small slit along the folded edge. Try not to cut with both fabrics folded together; the fabric at the bottom will have a longer slit than the one at the top.
- Now we can begin braiding. Start at one corner, and begin with the second right-most fringe. Take this fringe in your hands, making sure that you are grabbing both pieces of fabric together (a secure hold is the most important part!).
- Now, insert this fringe inside the slit of the fringe to its right. Pull it taut.
- Now, take the next fringe to its left. Insert this fringe through the slit of the fringe you just pulled. Make sure it lies evenly as you proceed.
- Your braid will naturally continue towards the left. Keep going until you have circled around the entire blanket. Your last pull should be through the slit you began the braid with, and you will be left with two loose pieces of fringe.
- Tie a knot with these two pieces to finish.
By echlds41 (Creative Commons Attribution-Share Alike 2.0 licence)
Bias Bound
For those who would like a cleaner, more sophisticated finish, a bias bound edge will do the trick. For this edge, you will need about three packages of bias tape – roughly 9 yards in total.
Your bias tape should be extra-wide, double-fold. Alternatively, you can make your bias tape , ensuring that each fold is a ½-inch wide.
You will also need coordinating thread, so as to properly secure the project.
- Begin by sewing together the bias tape, so that you will have one continuous strip tape. To ensure your tape doesn’t become bulky, be sure to join your tape with a diagonal seam. For a guide on how to do this, check out this tutorial here.
- Bias tape has two sides folded inward to meet in the middle. One side will be slightly narrower than the other. Fold the bias strip in the middle, and sandwich the blanket inside the fold. Make sure that the narrower side of the tape is on the right side of the blanket. You can iron the bias tape this way, so as to help it maintain its shape.
- You pin the bias tape around the edge of the blanket. Alternatively, you can start sewing and adjust the rest of the tape as you go. Sew a straight stitch as close to the edge of the bias tape as you can.
- If you ever run out of bias tape (or decided not to connect the tapes in the beginning), you can add more bias tape at this point. Line up the edges of the bias tape (connecting the narrower sides) and sew over the strips.
Pom-Pom Trim
A pom pom trim is another fun way to add flare to your fleece blanket. For this trim, you will need bobbin thread in a color that matches your trim, and top thread that matches the right side of your blanket.
For this trim, you will need about 7 yards of pom pom trim. Alternatively, you could also add trim to two sides of your blanket.
- Begin by lining up the pom-pom trim under your blanket. You will need to sew the trim on the wrong side of your blanket, so that the trim (attached to the pom-poms) is hidden from the back. Much like the previous trim, you don’t need to pin the pom poms to the blanket; you can adjust as you go along.
- Sew the pom-pom trim around the blanket using a wide zig-zag stitch. For the edges, fold the trim diagonally and sew. When you return to the beginning, fold the trim under and stitch.
Here’s a video showing an example of a tie blanket alternative.
Conclusion
Over the centuries (and recent decades), we’ve experienced a great number of innovations with fabrics – and fleece is one of them.
The fleece tie blanket is an excellent project for expert sewists and amateurs alike. With a few simple materials and (sometimes) no sewing required, these fleece tie blankets make a beautiful and functional gift for yourself and loved ones.
What’s your favorite way to make a tie blanket?


