
Quilling, also known as paper filigree, is an old art practice of taking thin strips of paper and coiling, shaping, and gluing them to make designs.
Quilling first became popular in the Renaissance period, when French and Italian nuns and monks found an alternative to expensive gold filigree.
They took gold-gilded remnants of paper left over from the trimmings of bookmaking and rolled and shaped them as decorations for religious objects.
Quilling originally mimicked much of the ironwork of the day, and later became a pastime in the 18th and 19th centuries for young ladies.
When colonists crossed the Atlantic, the art came to the Americas as well. At the time, they would decorate tea caddies and furniture.
Some of these pieces can still be seen showcased in museums today.
Modernly, paper quilling has become an inexpensive, relaxing, and beautiful hobby for many people.
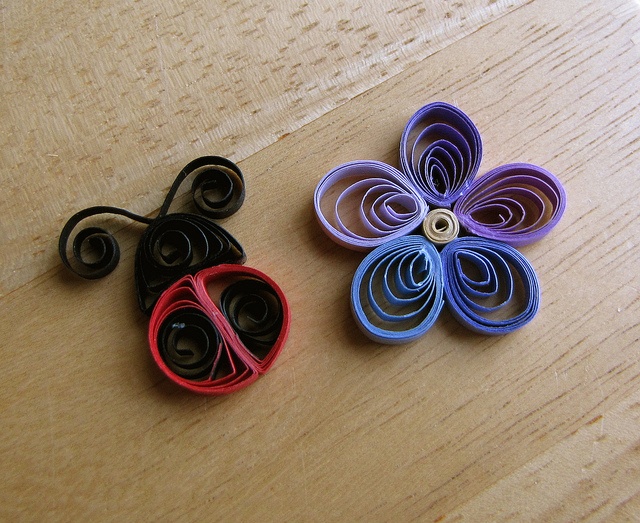
While quilling is best known for its use in handmade cards and invitations, it’s also used to decorate photographs, boxes, eggs, jewelry, mobiles, and more.
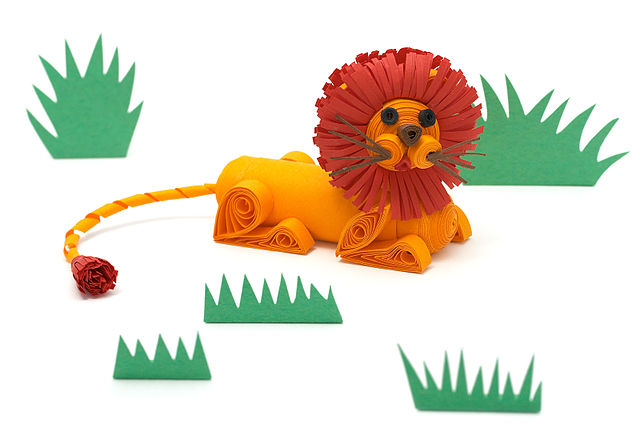
Advanced quillers have even made 3D miniatures, abstract art, and quilled flowers.
Modern and old quilled art can be found in museums all over the world, and one of the most well-known modern quillers is a Russian artist, Yulia Brodskaya.
Contents
How Do You Start Quilling?
Compared to a lot of other complex art forms, quilling is easy to learn, and inexpensive to produce; it simply takes a lot of patience and practice.
Most of the materials you need can be found at your local craft store or at online retailers.
There are many resources and tutorials free online that will tell you quilling designs step by step, from beginner to advanced, as well as books and classes.
There are even plenty of YouTube tutorials, for people who prefer a very visual learning experience.
It’s a perfect craft for kids, as it enhances fine motor skills and trains their hand-eye coordination.
So, what do you need to get started? Let’s take a look at some of the important tools necessary to teach you how to quill paper.
Tools for Quilling
Before you get started quilling, there are a few essential tools you’ll need to have on hand. If you’re not ready to invest the money into some of these tools right away, don’t worry.
You can always practice quilling first with some strips of plain paper and some sort of object to curl the paper around, such as a bamboo skewer, a toothpick, or a T-pin.
Once you begin to make more intricate designs, it may be worth getting tools made for the process, such as:
- Slotted Tool – This is the most important tool to help you quill paper, as it makes curling the coils faster and easier. You can use a toothpick, or even just your fingers to curl the strips of paper instead of buying this tool, but it is recommended to get tighter coils, and to save you frustration. It’s especially good for children or the elderly who may not have as steady or strong hands. For young children, you can buy a Curling Coach to use with this tool.
- Curling Coach – Aside from helping young children, this tool is also useful if you plan on making 3D miniatures. It helps you curl strips faster and easier than just the slotted tool alone.
- Needle Tool – This is used mostly to apply glue to areas that are difficult to reach by hand.
- Tweezers – Used to hold the more delicate coils and keep them from unravelling while you glue them in place. They also help insert the paper into tighter spaces.
- Crimping Tool – Just like its name implies, this tool is used to crimp pieces of paper for your design. This is great for making unique patterns.
- Circle Sizer Ruler – This helps you make your coils the desired size after curling them. You use the ruler on the side to measure the size of each strip.
- Scissors – Used for cutting your strips of paper. These do not need to be any particular kind, so find what is comfortable for you to use.
- Glue – Pick out glue that is suitable for paper, and clear-drying. It’s also good to have a damp cloth on hand when you get started so that you can wipe any glue off of your fingers as you work.
Types of Quilling Paper
So what is quilling paper, and why is it special?
Well, there are over 250 colors and designs of quilling paper available, ranging in various dimensions.
Many craft stores will also sell packets of pre-cut strips of quilling paper, saving you time from having to cut it all out yourself.
- Acid-Free Paper – As the name says, this paper is free of acids, making it perfect for scrapbooks, rubber stamping, or creating frames for pictures. This way, it won’t damage the pictures near it and will last for a long time.
- Graduated Paper – The edges of this type of paper have a solid color which gradually fades to white, giving your project a more dramatic look. Some graduated papers go from white to dark as well. When you use this type, a quilled ring begins with the dark shade and finishes lighter.
- Two-Tone Paper – This type of paper has a different color on each side, usually a lighter and a darker complimentary shade. This way you can use the same sheet of paper for many different coils in your project, creating a softer and more cohesive overall appearance.
Basic Quilling Patterns
Getting Oriented
Before you get started on your first project, make sure you have all of the tools you need, and a clean, well-lit work surface.
For your first projects, it is suggested that you use pre-cut strips of paper. This will make your work easier and more precise.
Once you get the hang of it, you can begin measuring and cutting your own strips. Start with a small project first to master the basics, then you can graduate to more complex designs.
When you first start, you may want to find a pre-made quilling pattern to follow. There are many printable ones available for free online, or you can purchase a quilling book.
Place the pattern beneath a sheet of wax paper, then follow the design you see underneath.
One of the best things to remember when quilling is “less is more.” This is especially important when it comes to using your glue.
Too much glue can ruin a project, and make it look lumpy and unrefined. You can always add more glue later, but it is almost impossible to take it away.
Your First Coils
So, how do you create your first coils? The technique depends on what kind of tool you are using.
If you choose a slotted tool, slide the very end of the strip into the slot. With one hand, turn the tool, and use your other hand to guide the strip of paper.
If you are using a needle tool, first dampen your fingers. This will help you hold everything in place.
Curve one end of the strip over the needle, then roll the strip around the needle with your thumb and index finger.
Apply even, firm pressure while holding the handle of the tool. Make sure you are only rolling the paper, and not rolling the tool.
Regardless of which tool you use, once your paper strip is fully rolled, let the coil relax, slide it off the end of your tool, and put a dab of glue on the end.
Make sure you use a very small amount of glue, and you may want to apply it with a toothpick or T-pin. Hold the end of the coil for a few moments as the glue dries.
Congratulations! You’ve just made your first loose coil. This is one of the most basic shapes of quilling. From this shape, you can create a multitude of other designs.
Other Quilling Shapes
Other shapes to try as you begin your projects include: teardrop, curved teardrop, marquise, double-curved marquise, square, diamond, rectangle, gumdrop, half moon, oval, bunny ear, duck foot, triangle, arrow head, and tight coils.

The size and length of the strips of paper will change the way your quilled shapes look, and as you experiment more, you’ll be able to find what works best for your personal projects.
Patience is the Key
The best tool you can have for your new endeavors is patience, and practice. Don’t get discouraged if your first few projects don’t turn out the way you initially planned.
This art form is delicate and precise, but sometimes mistakes can make a piece just as beautiful as when it goes perfectly.
Once you master the basics, don’t be surprised if you get the “quilling bug” and find yourself trying out more extensive patterns.
Reference Boards
A lot of people make themselves reference boards of shapes to help create more interesting designs later.
Make a sample of all of your favorite shapes, then glue them to a board to use as a reference for later projects.
Don’t be afraid to draw designs out on paper before you attempt to make them, and remember to break everything down into the most basic shapes possible.
You can do simple loose coils and build them on each other to create complex and 3D designs, all while doing the same shape multiple times.
There are many ways to connect to other quillers for questions and designs online, including popular social media boards such as Pinterest or Facebook.
Here’s a video showing how to make basic quilling shapes.
Overall Verdict About Quilling
There you have it! The basic ins and outs of this complex (and beautiful) art form.
Now that you understand where to begin, the sky is the limit.
Do you have any tips for quilling? Let us know!


