
From t-shirt vendors on the boardwalk, to outrageous body painting, to detailing on cars, to beautiful paintings, there are seemingly endless uses for airbrushing.
But first, where do you even begin to get into this art?

Contents
What is Airbrushing?
An airbrush is a tool that sprays paint or ink using air. Did you know the first airbrush was patented in 1876? The technology has come a long way since then, but the concept is much the same.
The airbrush uses compressed air to pull paint through the tool and atomizes the paint into very fine droplets.
The artist controls how much paint is allowed through using a trigger, which then gives the artist control over how much paint gets to the surface.
This makes for the seamless blending of colors, as well as a variety of techniques that are much harder, if not impossible, to accomplish with traditional paint and brush.
Because there is a variety of airbrushing equipment available, it’s become versatile and used in many different projects.
What Tools Do I Need to Airbrush?
There are two different types of airbrushes, so the first step is to figure out which kind you need for your project.
Gravity Feed
These airbrushes are where the paint is held in the color cup on top of the device. The trigger mechanism works the same as other types of airbrush, wherein you push down for air and gently pull back for paint.
This is generally the type of airbrush you want to use for doing finely detailed work and is commonly used on projects like cakes or t-shirts.
Bottom Feed or Siphon Feed
This is where the paint is contained in the color cup or bottle that attaches to the bottom of the brush.
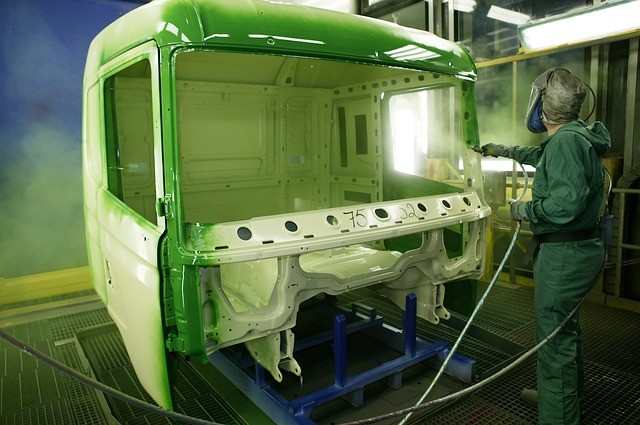
These are better for spraying thicker paints or covering larger areas, such as with painting cars or furniture.
Compressed Air
Once you’ve decided on your type of airbrush, you’ll need to have a source for the compressed air. Generally speaking, you’ll need an air source that can deliver a constant rate of 100 PSI.
You can purchase compressors at most art supply stores, available in varying sizes and price ranges. These are perfect for smaller projects like fine art, nail art, and small crafts.
You can also buy a standard compressor at most commercial home improvement stores. These types of compressors are best for art projects that will require thicker paints and bigger tanks, like auto art, furniture, and other more industrial projects.
Hoses and Holders
When you purchase your airbrush, make sure that you have a hose to go with it. This air hose will be specific to fit the brand of airbrush that you buy.
Most of these hoses will fit nearly all types of compressors, and some of them come with in-line moisture traps, which can help keep excess water in your air from bleeding onto your work.
Also look for an airbrush holder, which will help keep your airbrush from hitting the floor when you set it down to work and will help keep your area cleaner.
Miscellaneous
Once you have the basics, collect anything else you may need for your project, like drawing paper, airbrush stencils, easels, masking tape, rulers, etc.
Depending on your project, what you need will change, but make sure you have the medium you plan to paint on. Then, of course, assemble your paints.
The type of project will change the type of paint necessary. If you want to make your shopping list easier, there are airbrush kits available that have just about everything you need to get started.
Mask
Most importantly, make sure you have a mask or respirator, and a well-ventilated work area.
Since this machine breaks the paint into fine particles, they become easy to inhale and can make you very sick, especially with heavier or more toxic paints.
Even non-toxic paints like foodsafe airbrush formulas can leave you with breathing problems if exposed to over long periods of time, not to mention it is not a pleasant experience to inhale even once.
If at any point you start to feel faint or dizzy while working, leave the area, get some fresh air and water, and look into ventilating your workspace better before you continue.
How to Airbrush
Once you have all of your supplies—including your respirator! —you can start at last.
Mixing
Begin by mixing your paint. There are airbrush paints that come pre-mixed, but you can use any acrylic paint and dilute it with a little bit of water until you have an inky consistency.
Add water slowly, as you can always add more later if your paint is still too thick, but you can’t take it back out. This technique may take some practice, so don’t be too frustrated if a few tries are required to get it right.
Your kind of project will determine the type of paint used, so make sure you have the right choice for your art.
Testing
After your paint is mixed, it’s time to test it. Take your airbrush, and adjust the needle cap so that the needle does not touch it and you leave enough room for the air to escape.
On a piece of scrap paper, spray your paint to test the consistency. This is also a good time to practice using the level and button on your airbrush.
Try to keep the tip of the airbrush about eight inches from the surface; this will give you the smoothest effect and the most control.
Atomization Control
Once you’re content with the consistency of your paint, practice controlling the airbrush’s atomization.
Atomization is how finely the paint particles are sprayed, and the higher the pressure, the finer the spray of paint.
The type of paint you have will also affect the atomization, so don’t be afraid to experiment with different paints and different viscosities of your paint until you have the effect you want.
A fine airbrush needle and a low-viscosity paint will give you precision spraying.
Sketching
Got all that? It’s time to put it to work!
Sketch a light outline of your work, or lay down your stencil onto your work surface. You can use pre-cut airbrush stencils, or you can cut your own with plastic stencil boards and a knife.
If you are drawing your sketch, try to make sure the lines are as light as possible so that they do not show through your final paint.
Step back and take a look at your outline or stencil to make sure it is exactly where you want it to be. Then, it’s time to start painting!
Layering
As you begin painting, keep in mind that you can only have one color at a time in your airbrush. Fill in general areas first, and work from the bottom layer up.
Remember that you are layering paint to create the effects, so be mindful with very dark colors.
As you go, mask off any areas that you do not wish to paint, especially if it’s going to be a straight line. You can use tape and cut-out pieces of paper for sharp edges, or use a plastic sheet with an adhesive backing (called a frisket) cut to the size and shape you need.
As you get to more detailed work, finish with a finer needle and lower air pressure.
Don’t Forget the Sequence
The most basic thing to remember when airbrushing is this order: air on, then paint on, then paint off, then air off.
If there is a sudden change in air pressure, like when you turn the air on or off, you are more likely to have your airbrush spit or splatter paint, which could ruin your project.
This technique will also give you better control of your painting, and with practice, it will become second nature.
Sealing
When you’ve finished, seal the painting with a fixative. This will help protect it if it gets wet, and this is more necessary on certain work surfaces.
You can buy fixative sprays at most craft and hobby stores, and see the bottles to know what surfaces it is safe for.
Airbrush Cleaning and Care
In order to keep your airbrush in proper working order for project after project, cleaning it is the most vital thing.
To clean your airbrush, detach the paint if it is a siphon feed airbrush, and then immerse the airbrush into clean water.
Depress the trigger to wash out the paint—this is important both to keep your colors from mixing in the airbrush and to keep paint from drying and clogging the needle when you’re finished.
Take the airbrush out from the bath and blow the water onto a rag or scrap paper. When the water blows clear, your airbrush should be clean. Dry the outside with a soft cloth.
Airbrush cleaning solutions are also available to purchase. The most important thing is to make sure that paint is not left to dry inside of the airbrush, as this can damage the inner workings.
Clean your airbrush completely after each project, and store it somewhere safe from dust and debris.
Practice, Create, Improve!
Once you’ve practiced the basics, don’t stop! There are endless possibilities for your airbrushing and a variety of techniques available to practice.
Spend time watching tutorials online, or even watching street artists. There are many classes available at craft stores, as well as how-to books, podcasts, videos, and more.
The biggest thing to remember is to keep yourself safe, keep your airbrush clean, and don’t be afraid to experiment with new techniques.
As with any art form, the more you practice, the better you will become.
Here’s a video showing more details on how to airbrush for beginners.
Do you have any tips on the airbrush craft?


